Showing posts with label Dreamcast Shell. Show all posts

The Hunt for the PlayStation 2, GameCube and Xbox versions of the Sega Dreamcast

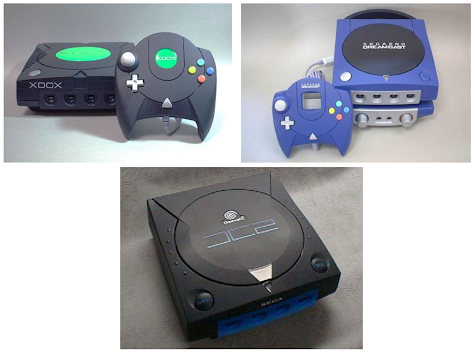
Over the years, fans of the Sega Dreamcast have had the opportunity to see many interesting and artistic case mods, but some of the oldest to make a splash in the Dreamcast scene were the ones you see below; case mods designed to look like the Dreamcast's sixth generation competitors: Microsoft's Xbox, Nintendo's GameCube and Sony's PlayStation 2.
Cool designs? Or heresy against the Dreamcast? These case mods have had many fans and detractors over the years.
Long-time fans may dimly recall seeing pictures of these customised Dreamcasts making the rounds on Dreamcast forums and fan websites as early as 2002. The pictures have continued to show up over the last 20 years on various forums, fan sites and social media pages across the internet (including a 2006 post on this very blog), although genuine information about their origin has tended to be scarce. Given their relatively polished-looking designs and their appearance around the time of the Dreamcast’s commercial death, theories and rumors have spread that a Japanese gaming magazine or even Sega themselves may have commissioned them to use in conjunction with a story or announcement about Sega’s decision to create games for third party systems. Some critics have even gone as far as to argue that the images were mere Photoshop creations and never even truly existed.

After being reminded of these designs through a chance encounter with a fan who had found the GameCube design for sale on an online marketplace, I set off on the complex mission of discovering the truth about these mysterious custom Dreamcasts. I searched my own memory, trawled through defunct websites of yesteryear on the Internet Archive, and even managed to track down and discuss the case mods with the original Japanese creator. After all of this, I can finally provide the authentic story of these early and unusual custom designs.

The Creator

Enter G-Cube – the name of a group of Japanese model kit builders. In the early 2000s, G-Cube was a group of three people who would get together and use their extensive modeling, graphic design and painting skills to cosmetically enhance existing model kits, toys and other items. 
One of many logos used by G-Cube
Their projects involved assembling things such as retail model kits with highly detailed custom paint jobs, some of which would also have significant modifications, including custom fabricated parts, to make finished products that were substantially different from their original design. The group’s work often included designs for mecha, figures, spaceships, and other vehicles from anime and video games. Over the years, G-Cube’s creations would be profiled in Japanese hobby magazines, and the group would even display their work at public exhibitions and festivals. The group would also take commissions from customers, and to this day, G-Cube puts recent creations up for sale on Yahoo! Auctions Japan from time to time.
Various older works by G-Cube
I was fortunate enough to find contact information for a Mr. Fuminori of G-Cube, who as luck would have it, was the designer behind all three of the Dreamcast case mods shown above. The following is a summary of information about each of the case mods...

We Have the Technology...

You may recall that very recently I attended a fantastic gaming event by the name of Play Blackpool. I wrote about my experiences here, here and here. The experience I want to refer to today though is the first link. And if you can't be arsed to move your mouse pointer back up to the previous sentence (or your finger - I know some of you hipster Dreamcast owners are reading this on iPads, for fuck's sake), you can just click here instead. Sorry - I meant here.

In that post, I mentioned in passing that I bought a 'new' Dreamcast console because it was white and not yellow. I won't go into that whole hideous saga again, but know this: the new Dreamcast didn't work. I only discovered that when I actually hooked it up to a TV and attempted to play my recently acquired copy of Skies of Arcadia on it. I'd previously 'tested' said system simply by plugging the machine into the mains and turning it on - the orange LED burst to life as one would expect and so I just thought all was fine and dandy. Imagine my complete and utter disgust then, when I finally got around to inserting some AV cables and attempting to play an actual game, and was confronted with a slow-motion, flashing boot screen which was then replaced by a totally white square where either a 'date/time' screen or a system menu should have been. Not impressed, was I. Hmmm... (that was meant to be an impression of Yoda, by the way).

I did a bit of Googling and deduced, after a good hour of trawling through posts from 2009, that my 'new' Dreamcast was pretty much fucked. There was only one thing for it - take the innards out of my yellow system and put them into the white case of the deceased machine. Simple, I thought. But upon opening up both machines and preparing for some surgery, I noticed that there were some discrepancies between the two consoles...

Pimp My 'Cast

Chances are, if you collect retro consoles you’re likely to own at least one beige-coloured piece of hardware. And the chances are that, if you’re reading this site, you own a beige Sega console. And that beige console is more than likely a Dreamcast. How do I know this? Magic, naturally, with a slight hint of mystical intuition. One of the more common problems I’ve noticed with the hallowed Dreamcast (yes, aside from the controller port fuse blowing) is that unless you keep it in the box and only ever get it out for special occasions (you know, like Christmas or a family funeral), it will eventually start to ‘yellow.’ Yellowing is what happens to lightly coloured plastic over time, where the chemicals that make up the dye in the plastic react with UV light and begin to break down, thus giving the material a tired and well...yellow appearance. And frankly, it looks shit. Add that to all the knocks and scuffs that build up over time (over a decade now, actually), and your Dreamcast can end up looking pretty sorry.

There are several remedies to this. First, you could attempt to ‘bleach’ your system’s shell as this Youtuber demonstrates...but that malarkey looks pretty dangerous to me - and besides, caustic chemicals do not mix well with hands that constantly drop cups of tea onto new carpets. Cough.

Secondly, you could spend a small fortune on one of those replacement cases that regularly pop up on eBay for fairly reasonable prices...but are located in Venezuela and so cost £30 to ship to the UK (granted, it may be cheaper to ship if you live closer to Venezuela but damn that’s expensive shipping). The Dreamcast shell is fairly easy to take apart and remove from the internal workings, so if you don’t mind spending the equivalent of a fortnight’s worth of food shopping on shipping costs, this is a fairly good way of pimping your Dreamcast.

But there is a third remedy. Enter DCJY reader Mike. He does shit like this to Dreamcasts:

Skies of Arcadia-cast

That right there isn’t one of those console stickers you just peel off and apply to your console - it’s a full on professionally applied vinyl coating. And you can have pretty much any design you want:

Jet Set/Grind Radio-cast

How is it done? I’ll let the man himself explain:

“Basically I work for a graphics and vehicle wrapping company, wrapping everything from race cars to motorbike helmets. I actually work in the finishing department. This involves cutting vinyl graphics, laminating prints, getting race car kits etc ready to fit, mounting custom graphics to Foamex and diabond panels etc.

For wrapping the Dreamcasts I first use an HD or similar quality image - this ensures that the picture doesn't look pixelated at all or blurry when upsized to fit the console. It's then down to the printing and artwork department to retouch the image (maybe change the colours slightly, resize it, upscale it etc). The picture can then be printed on cast vinyl in one of the HP Designjet L65500 printers (which are serious bits of kit), and it then comes to my department to be 'finished,' which in this case involves laminating it with some cast Arlon laminate, then trimming and applying to the Dreamcast. 

Placement is key to making the console look cool (you don't want to have an image of say Shenmue where Ryo's face is half off the console), and once you've got placement sorted apply the graphics and heat around all the different levels of the console. Trim carefully around the lid etc to ensure the join looks good. Then it's just a case of popping any air bubbles and trimming the edges and recesses nicely.”

I think you’ll agree that these custom Dreamcasts look pretty damned sweet, and as any image can be applied using the technique detailed in Mike’s explanation, you could have the world’s only Spirit Of Speed 1937 Dreamcast. Or not.


If you’d like to have your Dreamcast transformed - hell, go crazy and get a top-down view of a Sega Saturn or Neo Geo printed on it! - drop me an email via the link in my profile and I’ll supply contact details for Mike and his factory of wonders.